

Updated June 19, 2026 I like both ice cream and Brussels sprouts. However, there is a difference in my preference level between those two foods. I will choose ice cream over Brussels sprouts almost every time. I like ice cream more; it’s more valuable to me. Our pets are the same way. They may like a lot of different types of foods, but that doesn’t mean there’s no preference between them. There’s a difference between ice cream and Brussels sprouts even if you’re not picky.
Tag: dog training tips
Why Do We Use Food in Training?
A common question when it comes to animal training is:
Why are we using food to train?
Do we have to use treats?
Can’t I just use praise or petting?
Let’s dive into why we use food in training and why it can be so beneficial to the learning process. Doing so requires knowing a little about the science behind it and a reminder that only the learner gets to decide what is actually reinforcing to him.
Types of reinforcers*
There are several different categories of reinforcers, but let’s just focus on primary and secondary reinforcers for now. Primary reinforcers are those things that are necessary for survival: food, water, shelter, etc. Because they’re necessary for survival, all individuals find these reinforcing in most situations. Secondary reinforcers are things that have been paired with primary reinforcers so that they too become reinforcing: toys (paired with play and fun), petting (paired with physical contact), etc. Because they must be learned, they are not inherently reinforcing to all individuals.
As mentioned, food is a primary reinforcer because it’s necessary for survival. That’s why it’s so easy to use food in training; it’s [almost] always desirable! Whereas secondary reinforcers, which can be powerful training tools, need to be paired with a primary reinforcer first and in a way that makes them just as powerful. Essentially, we have to do extra training in order to make those things as successful. This is why toys may be reinforcing for one dog but not for another, whereas food is generally reinforcing for both. In short, primary reinforcers are more likely to actually be reinforcing without additional training and among those, food is usually the easiest to dispense.
*Side note: there’s a problem with how I’m talking about reinforcers in sweeping generalizations in this section which goes back to only the learner decides what’s reinforcing. We have to actually observe the behavior to see if it’s increasing or decreasing to deem something as reinforcing in that context. It’s not enough to just apply a reinforcer and assume that it’s going to work in the way that we intended; observation is vital. Additionally, reinforcers are not always desirable (yeah, behavior is weird sometimes) and so these sweeping generalizations can get dicey. In short, know that there’s a lot more to the story above and that this is just meant to dip your toe into this topic as a pet parent.
Common concerns
When speaking with pet owners, I find that the concerns about using food vs. another type of reinforcer have less to do with the actual science and “why”, and more to do with one of the following concerns.
“I’m worried about them gaining too much weight.”
I often hear something along the lines of, “He’s going to weigh 300 lbs at the end of this!” while speaking with clients about their pet’s behavior modification plan. While it’s said as a joke, it really is a way of voicing concern about weight gain. Others come right out and tell me that they’re worried about their pet gaining weight because of training. It can be a valid concern, especially for certain breeds.
If we’re working with a young, growing pet or a high-energy individual who hasn’t had weight concerns before, I tell my clients that while it’s something to keep in mind, we don’t necessarily have to be immediately concerned. Let’s start the behavior modification process and if we see some weight gain then let’s adapt accordingly. If we start to see problems or if it’s an individual or breed who is prone to weight gain, then we have some options:
- Use smaller treats (I break small training treats in halves or quarters even for Oso)
- Experiment with fruits and veggies for treats
- Set aside some of their meals to use for training
- If it’s a treat-heavy day then give them a little less during meal-time
“I’m worried they’ll get an upset stomach.”
There are many people who’ve experienced their pet having an upset stomach due to the type of treat or having too many treats. I often hear of pets throwing up or having diarrhea after hour-long training classes. Some pups will keep eating even if they’ve surpassed their limit! If this is something you’ve experienced, keep in mind that training sessions at home should never be that long.
As trainers, we have to compromise in providing longer services (aka training sessions) because it logistically works better; we wouldn’t recommend actually training that long (which is why there needs to be so much down time where the pet isn’t working during those services). I generally start with training for 2-3 minutes, then take a break, then train for another few minutes. Many pets are done after 10-15 minutes of this repeating cycle. Some pets (*cough cough* puppies) need less training time than that whereas seasoned learners can go for longer. Short bursts of training can be quite effective. And, short sessions means you’re not plying them with food for an hour at a time, causing upset stomachs.
The other factor behind this concern is for pets who have naturally sensitive stomachs. In that case, we should be speaking with the vet about what foods they can have and limiting the ingredients to what their stomach does well with. Sometimes we have to get creative when it comes to certain diets; a professional can help with that since it’s more specific to your individual pet’s needs.
“I don’t want them to become dependent on food.”
Cheeky response warning: I hate to break it to you, but if they’re alive then they’re dependent on food. We all need food to survive and that’s where the dependence comes from, not from using it in training.
What I think people really mean when saying this is…
“Do I have to use food for training forever?”
It depends. It depends on if you’re talking about one specific behavior or when teaching new skills, your pet, and a few other things. If you’re talking about always using food while teaching new skills, I would say the answer is, “Sure, because it’s easier to do so.” You could absolutely beef up your other reinforcers so that they’re as effective as food is at teaching new behaviors, but the “work smarter not harder” response is to continue using food for teaching new skills.
If we’re talking about one specific behavior, then my answer is still, “It depends.” Oso has a few behaviors that I never treat him for; I use “real-life reinforcers” to maintain the behavior. For instance, he knows an “up” cue for jumping on the furniture or jumping into our laps. The reinforcement for doing those behaviors is proximity to us (which his behavior has said is reinforcing) and being on the comfy furniture. However, there are behaviors that I will always treat him for because they’re a matter of safety and they need to be super reliant, like coming when called. Real-life reinforcers aren’t enough to maintain that specific behavior for him in all situations.
To break down that “it depends” into a more concrete answer: It depends on whether other things– like petting, praise, toys, etc.– are enough to maintain the behavior to the level you want/need it to be. If yes, great. You can maintain the behavior with other reinforcers. If no, then continue using food.
“It’s difficult to have food on me all the time.”
If you’re one of those people, like me, who doesn’t enjoy having treats in their pockets then yes, this is true. (More power to those people who do it, though!) To get around this, I have treat jars set up around my house for easy training and recommend that folks keep a stocked treat pouch attached to their leash for easier access.
“Food doesn’t always work.”
Even though it’s a primary reinforcer, there are reasons why food would not be reinforcing in certain situations. In more extreme cases, I’ve seen where punishment related to food has essentially made food itself scary. But the more common reasons are that we’re asking them to do something that’s not worth the food or that they’re not able to learn at that moment.
Let’s use a human example to explore when food isn’t worth it. Say you’re doing one of your favorite activities and someone approaches you and tells you that you need to stop what you’re doing and do your taxes instead. Fat chance, right? Maybe they offer your $5 to switch tasks. Thanks but no thanks. Now let’s say they offer you $50,000 to stop what you’re doing and do your taxes right now instead. I don’t know about you, but I would jump on that opportunity. If you were given $50,000 for switching from your favorite activity to doing your taxes enough times then you would readily make the switch because you have a reinforcement history for doing so with a reinforcer that’s worth it.
Now, let’s apply that to an example that I mentioned earlier: I always use food as a reinforcer for Oso’s recalls. Oso is outside doing one of his favorite activities of hunting for rodents. I need him to come inside so that I can leave; he’ll be left alone with something to do but it’s definitely way less fun than hunting for rodents. I could offer him the Oso-equivalent of $5 for coming inside: a kibble. Or I could offer him the Oso-equivalent of $100 for coming inside: treats he loves. A kibble just isn’t worth it; it needs to be better than that. Oso now has a strong enough reinforcement history that I don’t necessarily need to give him the treat but because I want to keep it as a super reinforcing behavior I will continue to do so.
The other reason why food might not work in that moment is because of stress, fear, or anxiety. Food isn’t reinforcing when you’re protecting yourself from a perceived threat. We’re just focused on living to eat another day at that moment. I wrote an article dedicated to this here, titled “Does Your Pet Have Mountain Lion Brain?”
Now what?
- If you’re hesitant to use food in training, which of the above reasons most resonates with you?
- Take the time to read through and sit with that point. What concerns do you still have?
- Speak with your behavior consultant or trainer about those concerns; they can help!
- Get to training and make your own observations. What reinforcers build super strong behaviors in your pet?
Happy training!
Allie


Bridging the Gap Between Training Sessions & Real Life
I told you last week that behavior challenges come in waves, and I’ve been hearing this one quite a bit this past week:
“He’s great in training sessions, but won’t do it in real life situations.”
Show of hands, how many of y’all have been here before? Yep, me too. The hard thing is that this is often when people STOP training. At this stage, you’ve already invested time, energy, and sometimes money into getting your pet to this level. And they’re still not where you need them to be. It’s frustrating. It’s disheartening. And it feels like training doesn’t work.
But! All that this means is that you haven’t completed the learning process. You’re only halfway through at this stage. I talked about this last year in a post called “Why You Should Care About the Stages of Learning”. Today, though, I want to share another aspect of what’s going on when your pet can perform a behavior in a training session but not yet in real life.
Let’s Talk Antecedents
Terminology alert: antecedents. [Immediate] Antecedents are those cues that tell an individual that a particular behavior-consequence contingency is available. Whoa. Too technical. Let’s break that down further…
There are different ways in which we learn. One of those ways is through the past consequences to our actions. This is often what we think of when we think of animal training. If the dog sits he gets a cookie. If the cat jumps on the counter he gets sprayed with water (just an example, we don’t recommend doing this). These are behavior-consequence contingencies. “If I do x, then y often happens”
Specific behavior-consequence contingencies aren’t always available. The antecedent tells the individual if it is or isn’t. For example, when I was little I burned my fingers while on a camping trip by picking up a grate that had been in a recently doused fire. You better believe that I learned that particular consequence that touching a hot grate hurt like heck in that single-learning event and have since avoided doing that. That’s only true, though, when the antecedent is: the grate was recently in a fire. When the antecedent is different, I pick up the grate without a second thought because that painful behavior-consequence contingency isn’t there. The antecedent tells me an important part of the puzzle as far as what I should expect the consequence to be.
What’s included in the antecedent?
Hoo boy, a bunch of things. While a lot of times you’ll hear the antecedent being referred to as simply the cue (eg: saying “sit”), really it’s the entire picture. This is often why your pet can perform a behavior in a training session but not the very different picture that real-life situations provide. Let’s illustrate that with an actual picture of me working with one of my favorite cats in the whole wide world: Grey.
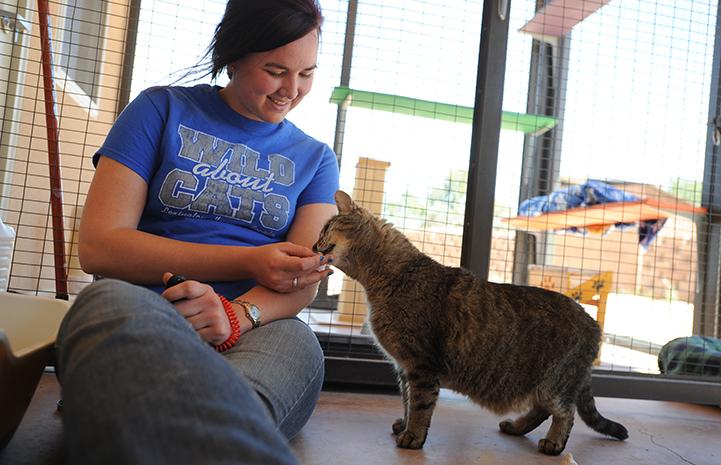
From this one picture, we can see a lot of factors included in that antecedent picture that told him this was a training session:
- Location: we always trained together in his cattery
- Position: I always sat while we worked together
- Presence of food & a clicker: clicker in hand, jar of baby food next to me
- Handler: our interactions together were always training interactions (teacher’s here; we’re going to learn new stuff!)
All of these factors told Grey that this was a training session and that there was a lot of opportunity for treats depending on his behavior. Change any of those factors and his behavior is also likely to change.
In short: your pet knows when it’s a training session and when it isn’t.
Why does it matter if it’s a training session?
There are two main reasons why I see this being an important distinction with my clients’ pets:
- The behavior-consequence contingency is different in training sessions vs. real life
- For pets with anxiety-related behaviors, training sessions aren’t always scary and real life often is
Let’s look at that first one.
The behavior-consequence contingency is different
Since we follow the 4 E’s of effective, ethical, efficient, and empowering training, I’m going to talk about this point in relation to treats vs. no treats, but know that this is true for other training or management tools too (eg: this is why dogs who walk politely on a prong collar usually don’t when the collar isn’t on). Treats happen quite a bit in training sessions. For many households though, treats don’t happen frequently when the humans aren’t in “training mode”.
In short: training session = possibility of treats, real life = no possibility of treats
Here’s where many people ask, “But shouldn’t they do it anyway even if there are no treats?” Here’s the thing. All behavior serves a function to the individual performing it. Period. End of story. That’s the reason that we stop going to work if we stop getting paid. Now, we don’t necessarily need to treat every time (a conversation for another time), but we can’t completely get rid of our behavior-consequence contingency. You’ve likely already experienced what happens when we do.
For pets with anxiety-related behaviors, training sessions aren’t always scary and real life often is
I see this a lot when I’m working with clients whose pets have stranger danger and we’ve started working on the doorbell. The pet will sometimes learn very quickly that doorbells are safe when played during a training session. However, that usually doesn’t immediately translate to doorbells being safe when they happen in real life. No one comes in the door during a training session but they do in real life. We need to do more work for that translation to take hold by continuing through the stages of learning.
How can I bridge the gap between training sessions and real life situations?
It’s a matter of proofing! Proofing, or generalization, is a necessary step in the stages of learning. To bridge the gap, we need to work on the same behavior in situations where the antecedent picture gradually morphs from “training” to “real life”. Factors can include:
- Your attention (is it on the dog or on regular tasks?)
- Where your treats are
- Location
- Distraction-level
- Other household pets being present
And so many more! Many pets have excellent attention to detail; never assume that a small factor can’t make a difference.
Now what?
- Choose one situation in which your pet does great while training, but hasn’t yet generalized the behavior to real-life situations.
- Determine all the factors that you can think of that make the training session different from the real-life situation.
- Choose one of those factors and incorporate that change into your training session. Only pick one at a time!
- When your pet is successful with the previous step, choose one more factor to integrate. Repeat in this fashion.
- If you’re struggling with how to do this, you’re not alone! This is a large reason why trainers & behavior consultants exist; we have experience breaking down those factors and strategically incorporating them. Email us at info@petharmonytraining.com to set up a session so we can help you!
Happy training!
Allie


Nuisance Behaviors? Try the Water Principle.
Warning: does not contain actual water.
Last week we revealed our April 2020 Training Challenge: Explore DIY Destructible [Trash] Toys. Check out our blog post with more info on that challenge here. In that post, I mentioned that this can be a great option for dogs who shred inappropriate items, like tissues, paper towels, bedding, etc. This week, I want to talk more about that concept– working with your pet’s natural behaviors– by first talking about martial arts.
The martial arts style of Hapkido follows three principles, one of them being the “Water Principle”. While that principle can have multiple meanings, one of them is that of water flowing down a hill. When the water reaches a rock, it flows around it. It’s easier to simply flow around the rock than to push against it
One of the things that we seem to forget when we bring animals into our homes is recognizing that they’re a different species with different needs. What’s natural and normal for them is not natural and normal for us, and vice versa. Many of the behaviors that we label as “nuisance behaviors” are really just a difference in what different species think of as “normal”.
We ask a lot of our pets. We ask them to essentially abandon what is normal to them in order to live in our society in a way that we deem appropriate. Perhaps it’s time that we start to loosen the reins and allow some room for their natural behaviors, too.
That can sound scary. It doesn’t have to be! We can work with our animals’ natural behaviors instead of asking them to change them: the Water Principle. It’s easier to give our pets items that they’re allowed to destroy instead of expecting them to never destroy things. It’s easier to provide chewies than to expect them to never chew. It’s easier to provide a digging pit than to tell them they’re never allowed to dig again. We can work with our pets’ natural behaviors instead of against them. We already do that by providing cats with scratching posts, so why can’t we do that with all the other natural behaviors as well?
One of my favorite ways to do this is by letting dogs jump to teach them not to jump on visitors. You had to read that sentence over a few times, right? It doesn’t seem like it could make sense. But it can! For young, high-energy dogs it’s often unrealistic to expect them to remain in a sit-stay or even just keep all four feet on the floor when guests come over. Even after quite a bit of training I see these dogs need to get in just that one jump, and then they can sit-stay like a pro.
In these cases, I say, “let ‘em!” Let’s teach them to jump up to a hand target, away from the person, to get those couple of jumps in before asking them to remain on the floor.
It looks like this:
The dog gets to jump, like they want, and the person doesn’t get jumped on, which is what we want. Win-wins like this happen when we work with our animal’s natural behaviors, instead of against them. Flowing around the proverbial rock just makes sense.
Now what?
- Think about the behaviors your pet does that you don’t like. Is there a way to let them perform those behaviors more appropriately? (Hint: almost always there is!)
- Set up the environment to allow them to perform those behaviors in a more appropriate way (aka: management). Encourage them to choose the appropriate option by making it easy for them to do so and reinforce the heck out of that decision.
- Start training! Oso didn’t immediately jump up to the hand target when I first got him; he had to learn how. Ask your trainer or behavior consultant for help with this if needed!
- How do you already apply the Water Principle to your pet’s behaviors? Tell us in the comments!
Happy training!
Allie
April 2020 Training Challenge: Explore DIY Destructible Toys
We hope you’re all doing well and staying safe in this crazy time! I’m personally really excited about this month’s training challenge as it’s something that I recommend to clients all the time:
Explore DIY Destructible [Trash] Toys
Not only is this a simple and cheap activity, but it’s often great enrichment, too! Dogs were made to destroy and gut things. But, unfortunately for them, we humans don’t love that natural doggy behavior. We get upset when they destroy their toys. We get upset when they steal tissues and paper towels and shred them to pieces. We get even more upset when they destroy our furniture.
Toys that we purposefully give to dogs to destroy serve a wonderful purpose. Our pets get to do what they were made to do and we don’t get upset with them for it. It’s a win-win! An even larger bonus is that when we allow our pets to express their natural behaviors in appropriate ways, they are less likely to express them in ways that we’ve deemed inappropriate. Yep, that means that you can curb that annoying stealing-tissues-and-playing-keep-away-before-your-dog-inevitably-shreds-it behavior by providing these sort of toys.
I’m always looking for a cheaper way to provide enrichment for Oso (who LOVES shredding things), so while I’ll occasionally get him stuffed toys to de-stuff from clearance bins, our go-to’s are DIY trash toys. As the name suggests, I make them out of literal trash. Supplies include:
- Newspaper
- Toilet paper rolls
- Paper towel rolls
- Empty tissue boxes
- Granola bar, cereal, and similar boxes
- Take out beverage holders
- Treats
Check out our video on how to put it all together here:
And here’s a video of Oso enjoying one of those creations:
It’s truly as simple as it sounds!
Now what?
- Make some of your own destructible trash toys! Watch the above video for tips on how to make them.
- Give one to your dog and let them go to town! Watch your pup the first few times you’re giving them new items. While the majority of dogs will not ingest inedible items (especially if you’re not actively trying to get the item away from them), we want to double check to make sure they’re not ingesting them. A little bit of paper swallowed along with the treat isn’t a big deal but we don’t want them eating the whole thing!
- Routinely provide your dog with these items for a couple of weeks. Do you notice any changes in their behavior? Tag us on Instagram @petharmonytraining with your findings, pics, and videos!
- We frequently recommend these toys for dogs who have behavior issues- everything from demand barking and playful mouthing to anxiety and stress-related behaviors. Click here to work with one of our behavior consultants to learn how to use these toys to help your dog de-stress and incorporate them into your dog’s behavior modification plan!
Happy training!
Allie

Smaller Steps Make for Faster Progress: Splitting for Pets
I recently met with the cutest new puppy, Maddie, and her family. Maddie’s mom told me that she was having trouble teaching their new puppy some basic manners. During their training sessions Maddie would get frustrated, grumble, and walk away. That made it frustrating for the humans, too.
I asked her mom to show me what she was doing and quickly discovered the problem: the steps were too big. I offered to work with Maddie and described the process I was using called “splitting”. Maddie made quick progress and was learning enthusiastically. Her mom exclaimed:
“Ohhh, I was expecting too much!”
Maddie’s mom started working with her again– this time splitting the steps– and Maddie learned enthusiastically for her as well. Hooray for Maddie and her family!
Splitting is the process of taking a task or larger step and breaking it down into smaller steps. It’s like teaching a child how to read: first we teach the letters, then how the letters sound together, then how to sound out parts of the word, then the whole word and so on. If we started teaching the word as a whole first the child would likely get frustrated and give up. We need to split it into smaller steps.
Here’s an example of splitting while teaching a go-to-your-bed-and-lie-down behavior:
- Look at the bed
- Lean towards the bed
- Take one step towards the bed
- Take two steps towards the bed, 3 steps,etc.
- Put one foot on the bed
- Put two feet on the bed, then 3, then 4
- Turn head over left shoulder
- Turn over left shoulder until facing human
- Bend elbows
- Lie down on bed
Even within this example there are several times that I lumped smaller steps together for the sake of convenience (which is usually why we lump instead of split in the first place!) However, you get the picture. There are a lot of steps that go into that single lie-down-on-bed behavior and we can and usually should be reinforcing our pet every step of the way.
Splitting allows us to create easier wins for our learners (all species included!) That means less frustration and more success. Splitting also makes it easier for us to have a higher rate of reinforcement (aka how frequently we’re treating) which can do things like speed up learning, boost confidence, and improve our relationship. Splitting provides us and our pets with a ton of benefits.
If there are so many benefits then why don’t we do it more? Well, splitting is a skill and like every skill we need to learn how to do it and practice it to become more efficient. Also, not only is it a skill that many people have yet to acquire, but it’s also a process that can seem counterintuitive. We need to take smaller steps to reach our goal faster? That doesn’t sound right. But, as we saw with Maddie, splitting into smaller steps usually does help us reach our goal faster. It’s like the old saying goes…

So the next time you and your pet are stuck take a moment and ask yourself, “How can I split this step?” Your pet will thank you for it!
Now what?
- Practice conceptualizing splitting. A good way to do this is to watch a video of an animal performing some behavior. Slow the video down and watch it frame-by-frame if needed. Write down each step the animal takes to perform the behavior; essentially, each new thing the animal does in each frame. If you’re looking for an extra challenge try to watch the muscles contract before the animal moves! Now that’s some serious splitting.
- Consider a behavior you would like to teach your pet. Write down each step your pet will need to take to perform the behavior.
- With your steps in hand, start teaching your pet the new behavior and treat each step along the way. Phase out treats as your pet becomes proficient at performing the smaller steps. Did your pet learn the behavior faster when you treated for each step along the way? Were you and your pet more or less frustrated? Were there times that you had written down smaller steps than your pet needed?
Happy training!
Allie
P.S. Next week we’re going to look at applying this concept to humans!